Monday, March 15, 2021

Agustin Marchesin - Scout Report vs Juventus

FC Porto goalkeeper Agustin Marchesin is a player having a great Champions League campaign. According to Statsbomb’s shot stopping data, he has saved his side the equivalent of three goals in the competition, having conceded seven goals from a total post shot expected goals (PSxG) of 10.1. This article will mainly focus on his performance in the second leg of his sides last 16 tie against Juventus, whereby a 3-2 defeat which none-the-less saw Porto progress on away goals following a 4-4 aggregate draw.

Brief Background Performance

The graph below assesses goalkeeper performance in this season’s Champions League across 3 metrics, goals conceded minus expected goals conceded as a measure of shot stopping as well stopped crosses p90 and sweeping actions p90 as a measure on shot prevention We can see that Marchesin appears in the top right of the chart meaning he is above average on both metrics, particularly excelling in shot stopping where he ranks 4th of all 35 keepers with 3 full 90s in the Champions League. His sweeping behind his defence, rather than ability to deal with crosses, is the key reason why he appears above average on the ‘X’ axis as well.

Height & Physical Attributes

Standing just under 6’2 Marchesin is slightly below the average height for elite level goalkeepers. However, he compensates for his slightly shorter build which excellent athleticism, an excellent leap and very good footwork/speed across his goal.

Marchesin vs Juventus – Shot Stopping

Machesin faced 12 shots on target in the game against Juventus, conceding 3 goals from a PSxG of 2.8 according to Statsbomb and 3.52 according to Wyscout. In the game Marchesin showed good decision making, athleticism, positioning, handling and speed to make a number of key saves for his side.

Set Position

Pre-shot Marchesin typically sets low, with his hands by his sides in a wide stance.

Just before contact he usually has a fairly significant arm swing, throwing his hands behind his body before using that momentum to drive his hands at the ball.

A lot has been made spoken about arm swing in the media, and on social media, in recent weeks in relation to its impact on shot stopping. Regarding Marchesin, it does not appear to hinder his shot stopping ability in most instances and his outstanding shot stopping data in both the Champions League and Liga Nos support this fact. Marchesin is incredibly athletic and the arm swing, although increasing distance/time taken to get to the ball slightly, seems to support his powerful and explosive movements. There are however some instances when the arm swing did hinder his shot-stopping in this game, and we will address these in the section below.

Marchesin is also ‘bouncy’ in his movements and set position. Constantly hopping as he sets and moves his feet. Again, while these movements are all part of his style and not always negative, the hops can be fatal if timed too late, significantly reducing his reaction time in such instances. We see an example of this later with the third goal.

Handling

Marchesin’s handling from shots was generally very good in the game. He showed soft hands to catch the ball in his diving technique and his scoop technique is superb. In the clip below he also demonstrates strong hands and good deflection technique/decision making, getting good distance on his save and sending it wide of goal on a tight angle

One v One

Marchesin made two good saves one v one, showing good decision making to close the space and drop into a pre-meditated block saves. In this first clip Marchesin’s save selection is perfect, although if being picky he could probably close the space slightly quicker, cutting the distance further between him and the ball as the shot comes in.

Marchesin’s second one v one save, late in normal time, was even better. As Chiesa jinks through on goal Marchesin is lightning quick in both his decision making to recognize the danger, and speed across the ground, closing the space brilliantly to get close to the all, dropping into an excellent pre-meditated block shape which covers the majority of the goal and making a big save for his team late in the game.

Positioning

Marchesin’s positioning was in the main very good for both long range shots and shots from inside the box. Marchesin favoured setting deep in his goal, maximizing his reaction time which allowed him to make potentially tricky saves look comfortable thanks to his excellent agility, athleticism and footwork. The clip below is a prime example of this.

Dealing with crosses

One area where Marchesin has ranked poorly this season is from crosses. According to StatsBomb data he has stopped just 3.4% of the crosses into his box in the Champions League this season. There are some discrepancies here in regards to what StatsBomb defines as a cross. Having reviewed footage of the game it appears that potentially StatsBomb only class balls from outside the width of the penalty area, or cutbacks from inside the area, as crosses. For example, in this match StatsBomb have Marchesin as stopping just one of 28 crosses into his box (3.6%), whereas having re-watched footage I noted Marchesin claiming three of 49 crosses (6.1%). To confuse matters even further Wyscout have Marchesin down as making two exits from 49 crosses, but one of their exits is different to mine. Alas, inconsistencies amongst data suppliers is a topic for another day.

The most relevant statistic here is the number of claimable crosses, subjectively noted by myself from video, which Marchesin attempted to deal with. I noted Marchesin down as catching 3 of 8 ‘claimable’ crosses, a very respectable return of 37.5%.

When setting for crosses and balls into his area Marchesin was always in a positive stance and aggressive start position. A large proportion of Juventus’ crosses were whipped in from deep, with Marchesin setting high on or near the six-yard box with a good open body position and his weight on the front foot ready to defend the space behind his defence. Here, his position is near perfect, set just back of centre with time to judge the ball, covering the key danger at the back post and high enough to cover the space behind his defence while still protecting his goal.

On more than one occasion however Marchesin found himself set high but too close to his near post. For example, in the clip below the optimum starting position would be just back of centre, accounting for both the depth of the cross and the main danger of Ronaldo arriving at the back post. Marchesin however appears unaware of this danger and likely destination for the cross positioning high and front of centre. This position gives him little chance of dealing with a cross into the danger area, although his footwork to get in line with the shot and subsequent positioning for the header are excellent.

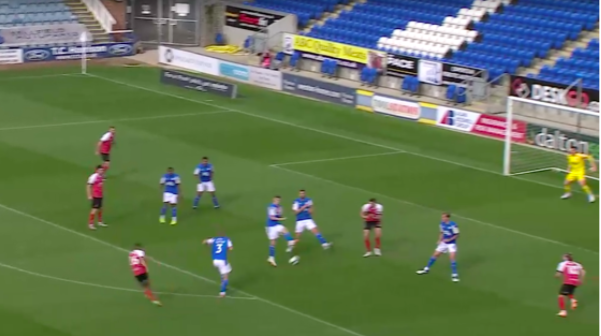
Juventus’ second goal on the night is a perfect illustration of Marchesin edging towards his near post for a cross and it coming back to bite him. Before the cross comes in there are three potential dangers to Marchesin’s goal; 1) a long range shot as the ball is inside the width of the 18-yard line 2) a through ball to Ronaldo near side 3) a cross towards the back post. Marchesin’s position, high and off centre towards his near post, is poor for both 1 and 3, and while he is covering the through ball this is likely by chance given the timing of Ronaldo’s run. The optimal position from this scenario is slightly deeper and slightly more central in his goal. From here he can cover and adjust to all three scenarios. With a slightly deeper, central position there is every chance Marchesin can claim or punch the initial ball. However, from his high, near post position he is forced to retreat towards his goal.

The goal also flags another idiosyncrasy in Marchesin’s game. He sets himself for shots and crosses low with his hands behind his body before swinging them out in front of him, you can clearly see this in the image below.

Although the goal is not a clear mistake per se it is savable, albeit requiring a top class save. However, by setting low, typically you want your hands slightly higher for headers, and behind him, he increases the distance to make the save while also sending his weight backwards (we see him fall back into the goal when attempting the save). These combinations of factors make the save from point blank range near impossible.

Juventus’s third goal also comes from a cross. On this occasion Marchesin’s low hand and significant hop as the shot comes in mean that he is not able to react to the shot. Indeed, the ball is only around 4 yards from goal by the time Marchesin lands and is able to initiate his movements towards the ball. This large, and poorly timed hop, is therefore fatal to his chances of making the save. Again, this is not a big mistake, although an elite keeper would expect to at least get close to making the save.

Moreover, at times Marchesin became over aggressive in his desire to protect the space behind his defence. In the clip below he makes a good claim at the back post. Indeed, Marchesin’s handling was good throughout the game, demonstrating excellent scoop and ‘W’ catching technique from crosses.

However, the ball is sent in from well inside the width of the 18-yard-box with Marchesin not protecting his goal, the near post is left open, and moving early once he sees Sandro glance at the back post. While his desire to defend the space behind the defence is commendable, his over aggression and failure to protect the goal is a concern moving forwards. When the ball is inside the width of the 18-yard line keepers should adjust their position to take into account the increased possibility of a long shot or through ball into the area. An opposition analyst working for the team Porto draw in the next round may note this example and look to exploit it, perhaps even with a fake glance to the back post before whipping a shot at goal toward the space at the near post.

At times Marchesin also demonstrated poor judgement or indecision when coming for crosses. Likely as a result of his positive mindset, Marchesin’s first step was often forwards even when the ball was out of reach. In the video below we see two clips. In the first his initial positioning is excellent, high and slightly off centre towards his back post; however, he starts to come before being bailed out by his centre back Pepe, who’s positioning and decision making from crosses was near flawless all game. In the second he starts to come for a cross before showing good footwork and recovery line to get set for the header. Indeed, Marchesin’s excellent footwork and movement across his goal often got him out of trouble when his judgement let him down.

The save below is further evidence of his brilliant footwork from crosses. As the cross comes in, he makes an early decision to retreat, although from his high start position he is favourite if he comes for the ball. After deciding to retreat his footwork is excellent and he takes up a perfect deep position to make the save.

Moreover, although he again swings his arm back as part of his pre-shot routines, he times the swing much better on this occasion than for the second goal. Getting his hands in line with his body pre-contact and in front of his body on/fractions after contact. Although his set position is not perfect his excellent positioning in terms of depth and alignment as well as well-timed arm swing allow him to make a very good save.

Sweeping

Marchesin was not regularly required to sweep behind his defence due to the deep block Porto employed for most of the game however when required he did demonstrate good aggression and anticipation when leaving his line, sweeping twice outside his area for an average distance of 16.4m. The clip below is a good example of this, coming out of his area to head clear from a bouncing through ball. Although we cannot see his start position, it is safe to assume that he took a good, positive position given how early he is to the ball.

Marchesin was also quick off his line to challenge Ronaldo when through one v one, attempting a well-executed slide tackle. This challenge was however very risky as well as unorthodox, with Marchesin probably better advised to lead with his hands rather than feet. Why Marchesin leads with his feet is unclear. It could be that he is incredibly confident in his tackling technique, although it could also be interpreted as a decision resulting from a lack of bravery to go with his hands.

Distribution

In the Champions League this year Marchesin’s short (<15 yards) and mid-range (15-30 yards) has been accurate, completing 100% and 96.4% of his attempted passes in each category. Marchesin has also sent the highest percentage of passes long in the competition at 68.8%, although his long pass success rate of 32.3% ranks him in the bottom 10% of keepers in the Champions League for long pass accuracy this season.

Long Passing

In this game Marchesin’s long passing from ground was mixed. When he had time on the ball he showed an ability to strike the ball with a good low trajectory, however his kicks were often inaccurate. When rushed, on more than one occasion he hit overly lofted clearances which lacked distance, an example of which is shown below.

Indeed, when pressed, his ball striking technique is not the best and can break down under pressure. Below is an example of that happening.

Support Play

Marchesin generally supported play from a deep position on the safe side. When receiving under press he took few risks usually opting to play quickly long. When safe to do so he did attempt to play out from the back, an example of this is shown below. Throughout the game his short passing was good, typically playing well weighted to the correct foot of the receiver.

Distribution From Hands

There was lots of evidence of Marchesin looking to distribute quickly from hands. Below we see him gather a long ball before quickly and accurately distributing to his fullback, hitting the back foot which allows the receiver to immediately touch and play forwards. His accuracy and weight of pass from all his roll outs were good.

When gathering balls in his area he frequently rushed to the edge of the box and looked to start a counter attack, including one time where he showed good creativity to distribute with a two handed ‘throw-in’ technique. Marchesin also demonstrated good, accurate over arm throwing technique.

Marchesin demonstrated good technique and accuracy when kicking from hands. Below is an accurate and well weighted side winder. Marchesin’s distribution from hands makes him particularly effective for setting counter attacks.

Ball Control

Marchesin generally showed a good first touch, taking a good, well weighted touch with his instep into his path allowing him to play with his second touch. The clip below best evidences Marchesin’s first touch ability.

Conclusion

Marchesin put in a very good display against Juventus to help his side progress in the competition. He was constantly positive from crosses as Juventus bombarded his box, was quick off his line to sweep behind his defence on three important occasions, made two fine saves one v one and a vital interception to deny a goal at the back post in the final minute of extra time. However, he did show some limitations in his technique when facing shots from crosses and at times put his side under additional pressure through his poor long-range kicking. He will also be disappointed with the third goal, where his set position technique denied him a chance of making what would have been a fine, but achievable, save.

Monday, November 30, 2020

Back to School: The Son of Britain’s Greatest Ever Manager Given a Tactical Lesson by Primary School Head Teacher


Saturday evening’s 2-1 defeat to a Chorley side sat 20th in the National League North, three divisions lower than Posh, was a frustrating, jarring and all-round miserable affair to watch as a Posh fan, although I’m sure the hierarchy at BT were delighted as it became increasingly evident second half that a huge cup upset was on the cards. Posh went into the match as the second highest placed side competing in the second round of the FA Cup, but then came away humbled and embarrassed, as Chorley’s Adelle inspired celebrations once again went viral on social media.

There are a number of areas we could focus upon when looking for answers. Posh’s apparent complacency which saw them outworked by a side who showed more hunger and desire for the fight and played at a much higher tempo than Posh could muster. Posh’s sloppy marking, which saw Chorley score twice from balls into the box under little pressure and amass a penalty assisted 2.14 xG, more than any League One side has managed against Posh this season. We could also praise Chorley’s strikers Connor Hall and Harry Cardwell, who aerially dominated Kent and Beevers all game, winning a combined 19/29 aerial duels providing a platform for Chorley to build attacks in Posh’s half.

But perhaps most worrying was that Posh weren’t just out-fought they were also out-thought. Chorley’s Jamie Vermiglio, a man who manages Chorley by night and at weekends but spends his weekdays as Head Teacher of Locking Stumps Primary School in Warrington, came up with a defensive game plan which caused Posh more problems when trying to build attacks than they were able to cope with. Posh did muster 11 shots in the game, but 7 of these came in the first 26 minutes. After that Chorley grew in confidence, applied their game plan more consistently, and largely dominated the closing 70 minutes.

Below I’ll analyse some key areas of their plan out of possession. The problems it caused Posh, the failed solutions Posh tried to adapt with before discussing alternative plans which could, and most likely would, have been more effective.


The Big Plan: Give Beevers the Ball

It really was that brilliantly simple. Let Posh’s least technically gifted player have the ball, make it difficult for him to pass to more gifted opponents, and gamble on him not having the capacity to hurt you. At least that’s what Chorley did consistently well after the first 20 minutes. In the early stages we saws some examples of the plan, but Chorley also regularly pressed Posh at the back, using their two centre forwards, and occasionally one central midfielder, to press Posh’s three centre backs. However, as we can see below, this ploy allowed Posh space to play out through their wide centre backs and wing backs before playing into either Dembele, Szmodics or Eisa between the lines in advanced areas. This is exactly how Posh want to play. It allowed them fairly easy ball progression in the opening exchanges as they were happy to exploit the space and passing options Chorley’s high press created and looked the superior side early on.


It’s easy to forget now but in truth Posh dominated the opening 20 minutes. They had six shots and amassed 0.77 xG, while Chorley only mustered two long range efforts from well outside the box. However, Chorley’s plan out of possession after the 20 minute mark became consistently much smarter and they quickly grew into the game.

Chorley matched up Posh’s wing back system by employing a 5-3-2 out of possession, but how they employed the system was as brave as it was successful. Chorley went man-to-man across almost the entire pitch. The three central midfielders man marked their Peterborough counterparts while the fullbacks covered Butler and Broom. In defence Chorley had a spare man with three centre backs marking Eisa and Dembele, which gave them the confidence to move with either player as they dropped between the lines. But it was their first line of defence which was the most interesting. Rather than remaining central, Hall and Cardwell operated as wide forwards out of possession, and attempted to block passing lanes to wide centre backs Kent and Blake-Tracy while also being in position to quickly apply pressure when the ball travelled out wide to these players. We can see an example of this setup below:


The red arrows show Chorley’s forward in wide areas ready to apply pressure to Kent and Blake-Tracey, the white arrows show Chorley going man for man in midfield while the black arrow shows centre back Smith following Dembele into midfield.

Now it doesn’t take a tactical genius (luckily for me) to spot that this gave Beevers A LOT of time on the ball. Chorley essentially gambled on two facts. First, they backed themselves to be able to keep track of Posh’s movements in midfield throughout the match. In the main they did this quite well, although at times they did get pulled out of shape, which is always a risk for a man marking setup. Second, they predicted that Beevers would not be able to pick a pass that would hurt them, and therefore frequently gave him freedom of the London Road pitch, sometimes well into their own half, to carry the ball and pick his pass.

Posh had some success, especially in the first half, when at times they managed to create and utilise space through intelligent movement and rotations. The video below is an example of this. Taylor drops deep into the left half space, this creates a central passing lane to Dembele, who has moved very deep into a position on the right of Posh’s midfield and created confusion as to who should mark him, before moving centrally to receive a ball through the lane created by Taylor’s movement.


The clip above shows why a man-for-man marking system midfield is so risky. Defensive players can be pulled out of position by opposition movement creating space which can be exploited by intelligent counter movements and a good passer. Unfortunately, the above clip was one of the few exceptions, rather than the rule, in terms of Posh’s buildup play.

Why? Beevers is a technically limited defender with a fairly limited passing range. Typically, playing in a back three masks these limitations by allowing him to shift the ball side-to-side to technically superior centre backs while extenuating his defensive strengths out of possession. Take the recent win against Plymouth as a comparison. When we remove backward passes, 74% of Beevers’ passes were played laterally with just 26% going forwards. When asked to shift the ball sideways Beevers is fine and his limitations on the ball are not as prevalent. However, against Chorley, just 57% of passes were lateral and 43% forward. Chorley challenged Beevers to pick and execute forward passes at the right time. The result, Posh limped through much of the game at a remarkably slow tempo as Beevers was slow to both select and then play his pass. Therein lied the intelligence of Chorley’s plan, let the least technically gifted player have the ball, remove his normal passing options, and make forward passes difficult.

The issue became even more pronounced as Posh lacked their usual out ball to the physical Jonson Clarke-Harris, again raising the question of whether they are good enough in possession to consistently build attacks without a physical striker up top and whether it was short sighted to sign only one player in this mold during the summer. Especially as Clarke-Harris’ injury record is far from perfect.

Posh’s performance got progressively more frustrating in the second half, as both Posh and Beevers struggled to progress the ball and get consistent possession in the attacking third. Below is an example of this. Dembele’s double movement is impressive, first looking to run in behind before dropping into space between the lines. There is a clear and simple passing line from Beevers to Dembele (white line; although Clarke also attempts to move into this space as he clearly does not anticipate the second movement from Dembele), except Beevers attempts an ambitious over the top through ball to Broom (yellow line), a pass he has very little chance of executing and Posh lose possession.


At times Posh’s movement was decent but Beevers failed to pick the right pass, at others it was far to static and he simply had no option. In trying to find an answer to the problem, Posh switched to a 4-2-3-1 in the 65th minute, and initially this caused confusion in the Chorley ranks and overloads in midfield. Below is a good example of this, Clarke and Broom have just switched positions leaving Clarke in space and Chorley centre back Halls is unsure whether to step out of the defence and mark him. However, Beevers again opts to hit a long pass to Mason rather than the pass to Clarke between the lines and the move quickly broke down as Mason became isolated against the touchline.


Beevers went long with increasingly regularity in the second half. He hit six long passes second half, all of which came between the 45th and 66th minute, when Posh switched shape, and resulted in an immediate loss of possession for Posh. Kent firing long diagonals into Clarke-Harris is a valid and dangerous tactic if you can get runners around him, but Chorley would have been more than happy every time Beevers fired long to either Broom or Eisa.

Posh looked progressively more desperate, frustrated and short of ideas as the half wore on. Players stopped moving off the ball as much with Posh increasingly static in a 3-2-4-1, and then 2-2-5-1 shape when in possession. Posh started trying to force passes through the centre, rather than switching play and testing Chorley’s setup up with off ball movement and switch of plays. The final act of desperation saw Posh send Beevers up front for the final five or so minutes and hit long balls in his direction. While such a plan made sense, it was also sad to see Posh resort to such a desperate tactic against a side 89 places lower than them in the football pyramid.

Chorley’s gamble defensively and decision to bank on Beevers not being able to pick out the killer pass was so successful in the second half that they did not concede a shot between the 40th minute and stoppage time as Posh looked progressively more lethargic and unlikely to score. In fact, it wasn’t until the final stages, when Chorley started to lack the legs and intensity to keep up their man-for-man marking scheme and therefore converted to a more orthodox narrow 5-4-1, shown below, in an attempt to congest the pitch and see out the game, that Posh managed to create a couple of late shooting opportunities in stoppage time. Before then their work rate, tenacity and desire to run off the ball, combined with their simple but effective game plan, had completely nullified Posh’s attacking play second half.


What Solutions Did Posh Attempt & What Could They Have Done?

In truth, aside from sending Beevers up front at the end, not many. Some of their midfield movement was impressive enough to create space but Beevers often lacked sufficient vision or technique to pick the appropriate pass. One solution Posh did employ was to drop Brown deep next to Beevers. By dropping into the defensive line, Brown left Chorley’s midfielders with the dilemma of whether to follow him, and be pulled way out of position, or give him space and sit off. They predominantly did the latter and Posh had some success with this ploy, as shown below, given Brown’s superior passing range and vision. 


A lot of the time however this tactic was not particularly successful, and it certainly didn’t help speed up Posh’s ball speed. The issue was primarily that, with Brown dropping deep next to Beevers, Posh had one fewer player ahead of the ball to pass to. When playing in a back three a better solution would have been a three player rotation between Beevers, Brown and Blake-Tracy, which would have got Brown on the ball instead of Beevers, maintained Posh’s midfield balance and ensured Posh did not have two players effectively standing side by side, reducing their options to play. The player movement is shown below:


From this position Brown would have been able to dictate play rather than Beevers, while also having Blake-Tracy ahead of play in midfield and maintaining the balance of Posh’s shape. The system would also have been easy to transition out of as the ball was progressed. From a central midfield position Blake-Tracy can easily over-/under-lap into wide areas, so his ability to drive forwards and energy would not be compromised, while it is simple for Brown to then step forwards into his usual central midfield role to support more advanced possession from midfield. If possession is lost in the first pass, Posh still have three players behind the ball to deal with transitions.

 One issue with Brown in that role was his reluctant to carry ball out of defence and commit a player to press him, freeing up space further up the pitch. At times, Posh could therefore have considered using a similar rotation on the right hand side, getting Taylor into Beevers’ position and driving with the ball out of defence. 


Both of these rotations would have had the benefit of posing Chorley’s midfielders and attackers significant questions. Who tracks the midfielder dropping deep? Do the forwards still cover the wide passing lane, which now leads to Beevers, or move centrally to cover Brown/Taylor? Who picks up Kent/Blake-Tracy when they move into midfield? These are the sort of moments of indecision and confusion which such rotations create, thus creating space for players to receive passes which would have otherwise not existed.

In a similar vein another rotation Posh could, and for my money should, have employed more regularly was between Dembele and Taylor/Brown. One of Chorley’s centre backs typically followed Dembele when he dropped into an attacking midfield zone, but they would not follow him much further. By dropping deep into midfield Dembele would have become free to receive the ball, Taylor (or Brown) could then have moved forwards into the vacated attacking midfield area. This could have been performed as either a two or three man rotation.

Option 1:


Option 2:

Either way it poses significant questions for the opposition. Does the central midfielder track Taylor, or leave Taylor for the centre back and cover Dembele? How far is the centre back willing to travel to cover Dembele? How quickly will they react to Taylor if he gets free? Again, this creates the  level of confusion/indecision needed to allow three of Posh’s best attacking players to get on the ball in space.

Other solutions? Well, Posh struggled to get their wing backs involved in the game. Fergie seemed obsessed with the idea of the wing backs providing width high up the pitch. However, in this position they were both easy for the fullbacks to keep tabs on and almost impossible for Beevers to find. Had they dropped back more often they would have asked the question to Chorley’s fullbacks of whether to follow them. If they do, then this creates space for Eisa, Dembele and Szmodics to run-in behind out-wide (I won’t get started on the lack of runners in behind!). If the fullbacks stay deep Posh have a spare man out wide and a potential 2v1 against Chorley’s wide forwards. This essentially gives them a solid base from which to build attacks.

Posh also had Edwards on the bench, a player who oozes calmness and composure on the ball and with the ability to play crisper and more difficult passes than Beevers. Could he have replaced Beevers after Posh went behind? I certainly think he would have helped speed Posh’s passing game up a notch or two.

Perhaps they could also have been braver with Pym. On a number of occasions he played the ball to Beevers in his own box for Beevers to carry out. Could Pym have been the player to do so on occasion? Could he have tempted Chorley to press him and create space for others? Risky perhaps, but he has the technical ability to do so and a superior passing range/ability to Beevers.


Conclusion

It was a chastening experience for players, staff and fans alike on Saturday. Posh failed to match the intensity and desire of their opposition, while Fergie and his players were also left tactically outwitted by a man who spends more time running a school than managing his football club. This is not the time for sweeping change however. Posh have been poor in possession too often this season and at times Fergie has lacked the tactical intelligence to change this. But Posh are second in the table, helped in part by a generous fixture list to date, and have looked much more organised and solid defensively since the start of last season than at any other point during the Darragh McAnthony era.

If Posh have serious top two aspirations then their attacking performances need to improve. But this is a side still transitioning and finding a way to play without the talismanic Toney and that has also lost its entire first choice right side with Ward and Thompson out injured, two players who were instrumental to Posh’s game plan and results early in the season.

There is no excuse for Saturday. It will be filed away in the hall of shame of Posh performances and referred back to every time Posh suffer a shock defeat to relative minnows. However, the first 45 minutes against Plymouth had enough positives in attack to show that Posh are finding the attacking feet in this post-Toney era and Fergie should be given time to turn around a run of three shocking performances out of four. He did it in January when things were looking much worse than they are now and I for one think he will do it again. Although I’d argue that signing a forward who can fulfil Clarke-Harris’ role in his absence, likely at the expense of selling Mo Eisa for a heavy loss to make room, is now a necessity in January.

Friday, September 25, 2020

Analysed: The Four Goals Posh Have Conceded so Far: Unfortunate Worldies or a Result of Structural Weaknesses?

 Introduction


Despite conceding four goals in the three games in which Fergie has picked his strongest XI available (two league games and Carabao Cup), Posh’s defensive statistics have been hugely impressive thus far. They have averaged just six shots against (18 in total) and an xGA of 0.54 (1.62 in total) in the opening stages of this campaign. 


There are potentially external reasons as to why Posh’s shots against and xGA record are so low. League One sides have perhaps not hit their best attacking form yet this season, probably due to the long layoff and a shortened pre-season leaving players rusty. The League average xG per match so far this season is 1.24, down from 1.37 throughout 2019/20 and 1.46 during 2018/19. Despite the league wide drop off, in League One Posh have conceded the second fewest shots p90 and have the third best xGA from the opening two league matches.


While such incredibly low numbers are likely unsustainable, Posh’s early season form is not far from their defensive record with a back three last season. In the thirteen games which Posh started in a back three they conceded just 10 goals at an xGA per match of 0.84. This shows that Posh’s defence, for so long a major weakness, is now a relative strength.


However, despite these excellent defensive numbers, Posh are yet to keep a clean-sheet and have committed individual and team errors in their games so far this year. This has led to the concession of four goals in three matches, with the goals coming from efforts from outside the box (3) and a corner. Below, I’ll take a look at the four goals conceded to highlight why Posh have conceded more than the one or two goals the xG models predict they should have. 


Fleetwood Town


Let’s start with the most recent concession at home to Fleetwood Town, which resulted from a corner. Posh lined up in a broadly similar defensive setup to last season. The key differences were that Jonson Clarke-Harris (red) has replaced Toney as the six-yard box zonal marker, from where he achieved two clearances in the game. The only other change is that the second zonal marker, in this case Szmodics, has moved position shown by the arrow. This new position should be a more advantageous position to defend short corners, affect the flight of near post deliveries by forcing them to be hit higher while also moving Szmodics into a better position to launch a counter attack from. 


The key personal battle for the goal is that between Camps, the goal-scorer, and Taylor, his man marker, which I have tried to highlight in yellow. In theory this should be a fairly even match up. Although Taylor is listed as standing 5cm taller than Camps (185cm to 180cm), the players’ career aerial duel records are almost identical (45.5% for Taylor to 45.4% for Camps) while Camps has a significantly superior loose ball duel success rate (42.5% to 35.2%). In the end that last factor is perhaps the telling one, as Camps shows greater desire to win the ball than Taylor and fires home. Let’s analyse how the corner gets to that point.


Above we can see how Taylor starts tight to Camps, grappling him from behind. Camps then spins

to his right, getting ball side of Taylor, but Taylor stays tight and is in an OK position.


In truth, I think the corner is overhit and actually aimed for the three players at the near post with Broom and Szmodics’ presence forcing the ball higher than it would otherwise be. If I’m wrong and it’s in fact intentionally worked so that the three players move near post creating space for Camps to move late into the space then it’s a brilliantly thought out and executed routine and I sincerely apologise to those involved at Fleetwood!


Either way, Camps reacts quickly (or as planned) to arrive and attack the ball in the space created by the three runners. As mentioned, Taylor initially does a pretty good job of tracking him and staying tight.


Camps however stretches for the ball and makes a full-blooded attempt to get there. Look at Taylor’s foot placement in comparison, his effort is somewhat half-hearted. Perhaps he is worried about giving away a penalty but Camps movement and determination to win the ball 1v1 is the key to this goal. 


Accrington Stanley


Next, let’s review the two goals conceded against Accrington Stanley. Those two were probably the worst two goals conceded from a tactical point of view, each for different reasons. 


Before getting onto the goals individually, it’s worth noting that the next three goals we’ll look at were all scored from outside the box. While Posh’s defensive setup has been solid, their usual 5-2-3 shape off the ball means that although Posh do a good job of limiting the space behind the defence and in front of the front three, when you get past the initial press there can be a lot of space in front of the back five/in midfield areas to exploit. This means that often sides can create good shooting opportunities from 18-25 yards out. These chances may also be better than xG models suggest for the two following reasons:


  • Posh’s setup means often opposition players have time and space on the ball to pick their shot, increasing the chances of scoring

  • In goal Christy Pym is probably a better reaction/close range shot stopper than he is with shots from distance. At times his footwork, dive selection and reaction time for shots from range can mean he doesn’t cover as much ground as he could (possibly should?)


Let’s take the first goal as a prime example of this. 


First-up it is important to give due credit to Dion Charles, the goal-scorer, who’s movement throughout the build-up was superb. First below, we see him threaten to run in behind out wide, this creates a large gap between Kent and Beevers which can then be exploited.


Below is the picture that we see as the cross comes in (it’s cleared and Charles scores from the second ball). Charles (circled), is now ghosting into the space he’s created on Kent’s blind side (again credit where it’s due, very clever). The question from a Posh perspective is how to do you cover that space? You can just about see that Accrington have two players attacking the back post which means the back five can’t shuffle across and Beevers can’t go on his own without leaving a huge space for the two runners to attack.


Typically, if you have more men in midfield you would drop one of them into the space shown by the blue circle and defend with a layered, rather than flat, midfield line, but Posh can’t do this without giving Seamus Conneely (28) too much space to attack if Hamilton drops, while Taylor is man marking the nearest passing option and can’t drop without allowing Accrington an easy switch of play to exploit the far side. Therefore, Posh can’t immediately cover that space with a midfielder. What it means then is that when the cross comes in one of two things should happen:


  • Kent, if he recognises Charles’s movement and the lack of danger behind Beevers, can choose to cover that move rather than dropping into the defensive line. However, he doesn’t spot Charles’s run and moves to cover the back post where there is little threat

  • Both Taylor and Hamilton should drop to cover the 18-yard line as the cross comes in to ensure there’s not too much space in front of the defence. However, both of Posh’s midfielders, especially Hamilton, switch off, giving Charles complete freedom on the edge of the box. 


The next clip is a full two seconds after the cross has come in. Kent is retreating to the back post and unaware of Charles’ movement. Taylor (8) has started to drop centrally but is perhaps a little slow in his actions. However, look at Hamilton (22), he is looking straight at Charles but at no point moves to cover him. He should have taken charge of the situation, recognised the danger, and dropped to cover it earlier. There was four seconds between the ball being crossed and Charles’ volley (second clip below), of which Hamilton was directly watching Charles for a full three seconds without reacting. In fact, it is Taylor who eventually spots and reacts, admittedly too late, to the danger. Despite all this Posh can count themselves a little unfortunate to concede as Charles’s technique and execution of the volley is outstanding!


The second goal comes after Posh switched formation in search of an equaliser. I saw most people describe it as a diamond, although to my mind it was more a narrow 4-2-2-2 with two holding and two attacking midfielders. Either way, the shape left Posh defending very narrow and painfully short of cover on the side away from the ball. This problem is compounded when Beevers slips meaning Thompson and Kent both have to travel even further across to cover. When Beevers’ excellent recovery tackle breaks to Uwakwe, Posh simply have no way of getting across to apply pressure to Uwakwe who curls a beautiful finish home under no pressure. Anyone who watched Posh in a diamond last year will be familiar with their struggles defending the side furthest from the ball.

For both goals, the lack of pressure undoubtedly makes the chance easier than it would otherwise be, but Posh can count themselves very unlucky to have succumbed to two sublime finishes. Where you stand on the unlucky to poor defending/setup sliding scale of blame depends largely on personal viewpoint and in truth the answer lies somewhere in the middle. Posh will not continue to concede worldies with the regularity they have thus far, but they could also help themselves by doing a better job of defending the space in front of the defence.


Cheltenham Town


Finally, let’s look at the first goal Posh conceded this year, in the 1-0 Carabao Cup defeat to Cheltenham Town. There’s a lot going on here to dissect.


First, the eagle-eyed viewers among you will have noticed that, from the corner, Posh’s setup was the same as

the one from last season as opposed to the one from Fleetwood, with the front zonal marker, in this case Ward,

near the corner of the six-yard box rather than close to the corner taker. It remains to be seen whether the

change for Fleetwood was due to Fleetwood having a player in position for a short corner or a change in

system. To muddy the waters even further, against Accrington, Posh setup with both two zonal markers in

the six-yard box AND the man nearest the corner taker (this was the case for two of the three corners, for the

first they did not have a man near the 18 yard line), before ditching the second six yard box zonal marker vs

Fleetwood. Last season Posh rarely changed their defensive corner setup so this may be a sign they are

becoming more responsive to the threats of the opposition, which to my mind at least is a good thing.


Posh with the extra man in position near the ball and two zonal markers in the six-yard box against Accrington. Coincidentally, this was a change I recommended making in the following article in February: http://wearetheposh.com/uncategorized/posh-defensive-corner-setup-could-it-be-better/

The relevant section and logic behind the change can be seen below.


Next, there is the fact that Posh leave goal-scorer Sercombe unmarked on the edge of the box. Eisa to his credit drops back, however fails to pick up Sercombe. Again, in the second image taken from the Accrington game we can see that Posh address this error.


Then there is the rather unfortunate fact that Sercombe strikes his shot past three players in position to block, including through the legs of Beevers. However, Taylor does not help his own course by jumping as he goes to block meaning the ball goes underneath him. If we’re being super critical, we could also criticise Taylor for turning to his side in the block, which makes a clean block less likely and increase the chances of a deflection wrong footing the keeper.


Finally, and again this is super critical, Pym makes a technical error on the save, although the shot is hit hard, comes through bodies reducing his sight and reaction time as well ending up low and close enough to the corner that it would be an incredibly hard save to make even with the correct technique. That said, if you watch closely when the shot comes in you’ll see Pym takes a ‘negative step’, moving the foot furthest from the direction he wants to dive, in this case his left, away from the ball. He should take a ‘positive step’, moving his right foot towards the area he wants to dive to which would allow him greater coverage of his goal. If he does this then maybe, just maybe, he has a chance of saving the shot. I’ve tried to illustrate this in the clips below.


Pym’s start position is very good. He’s deep, roughly one yard off his line which maximises his reaction time and he has got in line with the ball well.


Now compare where his feet are in relation to the last picture. His left foot has moved away from where he needs to dive while his right foot is in roughly the same position. He has therefore begun to execute a ‘negative step’ dive. If he steps across the goal with his right, rather than away with his left, he can cover more ground in his dive.

The shot is fairly close to the corner and hit hard. However, Pym isn’t a million miles from saving it. If he takes a positive step can he get there? Maybe, maybe not…


Conclusion


To finish, I’d like to reiterate that, despite the fact I have largely looked at flaws in Posh’s defensive structure, they have, since switching to a back three in January 2020, been excellent defensively. No defensive structure can ever be perfect and in Posh’s case it’s been shown that they can at times be exposed from set plays, while the area in front of the defence can also be an issue. 


However, the latter especially is not a huge problem, although it is one they should still look to find solutions to. Teams will not continue to regularly bang goals in from 18+ yards, although they will probably score from a higher than average rate from these areas given Posh’s setup and extra space/freedom on the ball. When Posh come up against sides with very technical and creative players in these zones they could also be in trouble, but how often will that happen in League One this season?


Posh have also slightly tweaked their defensive corner setup and the goal against Fleetwood came from an individual, rather than structural, error. It remains to be seen whether Posh have sufficiently addressed some of the weaknesses they showed when defending corners last season, when the front and back post areas could at times be exploited by opposition sides. This is definitely one area to keep a keen eye on in future games.