Introduction
Despite conceding four goals in the three games in which Fergie has picked his strongest XI available (two league games and Carabao Cup), Posh’s defensive statistics have been hugely impressive thus far. They have averaged just six shots against (18 in total) and an xGA of 0.54 (1.62 in total) in the opening stages of this campaign.
There are potentially external reasons as to why Posh’s shots against and xGA record are so low. League One sides have perhaps not hit their best attacking form yet this season, probably due to the long layoff and a shortened pre-season leaving players rusty. The League average xG per match so far this season is 1.24, down from 1.37 throughout 2019/20 and 1.46 during 2018/19. Despite the league wide drop off, in League One Posh have conceded the second fewest shots p90 and have the third best xGA from the opening two league matches.
While such incredibly low numbers are likely unsustainable, Posh’s early season form is not far from their defensive record with a back three last season. In the thirteen games which Posh started in a back three they conceded just 10 goals at an xGA per match of 0.84. This shows that Posh’s defence, for so long a major weakness, is now a relative strength.
However, despite these excellent defensive numbers, Posh are yet to keep a clean-sheet and have committed individual and team errors in their games so far this year. This has led to the concession of four goals in three matches, with the goals coming from efforts from outside the box (3) and a corner. Below, I’ll take a look at the four goals conceded to highlight why Posh have conceded more than the one or two goals the xG models predict they should have.
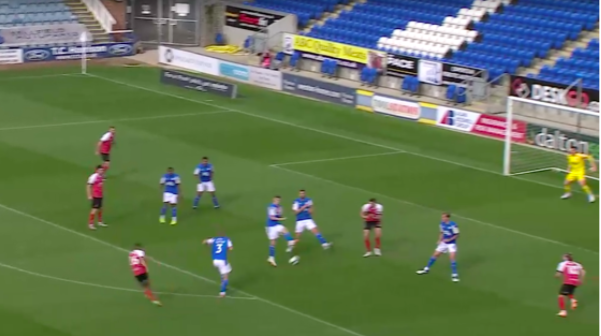
Fleetwood Town
Let’s start with the most recent concession at home to Fleetwood Town, which resulted from a corner. Posh lined up in a broadly similar defensive setup to last season. The key differences were that Jonson Clarke-Harris (red) has replaced Toney as the six-yard box zonal marker, from where he achieved two clearances in the game. The only other change is that the second zonal marker, in this case Szmodics, has moved position shown by the arrow. This new position should be a more advantageous position to defend short corners, affect the flight of near post deliveries by forcing them to be hit higher while also moving Szmodics into a better position to launch a counter attack from.
The key personal battle for the goal is that between Camps, the goal-scorer, and Taylor, his man marker, which I have tried to highlight in yellow. In theory this should be a fairly even match up. Although Taylor is listed as standing 5cm taller than Camps (185cm to 180cm), the players’ career aerial duel records are almost identical (45.5% for Taylor to 45.4% for Camps) while Camps has a significantly superior loose ball duel success rate (42.5% to 35.2%). In the end that last factor is perhaps the telling one, as Camps shows greater desire to win the ball than Taylor and fires home. Let’s analyse how the corner gets to that point.

Above we can see how Taylor starts tight to Camps, grappling him from behind. Camps then spins
to his right, getting ball side of Taylor, but Taylor stays tight and is in an OK position.
In truth, I think the corner is overhit and actually aimed for the three players at the near post with Broom and Szmodics’ presence forcing the ball higher than it would otherwise be. If I’m wrong and it’s in fact intentionally worked so that the three players move near post creating space for Camps to move late into the space then it’s a brilliantly thought out and executed routine and I sincerely apologise to those involved at Fleetwood!
Either way, Camps reacts quickly (or as planned) to arrive and attack the ball in the space created by the three runners. As mentioned, Taylor initially does a pretty good job of tracking him and staying tight.

Camps however stretches for the ball and makes a full-blooded attempt to get there. Look at Taylor’s foot placement in comparison, his effort is somewhat half-hearted. Perhaps he is worried about giving away a penalty but Camps movement and determination to win the ball 1v1 is the key to this goal.

Accrington Stanley
Next, let’s review the two goals conceded against Accrington Stanley. Those two were probably the worst two goals conceded from a tactical point of view, each for different reasons.
Before getting onto the goals individually, it’s worth noting that the next three goals we’ll look at were all scored from outside the box. While Posh’s defensive setup has been solid, their usual 5-2-3 shape off the ball means that although Posh do a good job of limiting the space behind the defence and in front of the front three, when you get past the initial press there can be a lot of space in front of the back five/in midfield areas to exploit. This means that often sides can create good shooting opportunities from 18-25 yards out. These chances may also be better than xG models suggest for the two following reasons:
Posh’s setup means often opposition players have time and space on the ball to pick their shot, increasing the chances of scoring
In goal Christy Pym is probably a better reaction/close range shot stopper than he is with shots from distance. At times his footwork, dive selection and reaction time for shots from range can mean he doesn’t cover as much ground as he could (possibly should?)
Let’s take the first goal as a prime example of this.

Below is the picture that we see as the cross comes in (it’s cleared and Charles scores from the second ball). Charles (circled), is now ghosting into the space he’s created on Kent’s blind side (again credit where it’s due, very clever). The question from a Posh perspective is how to do you cover that space? You can just about see that Accrington have two players attacking the back post which means the back five can’t shuffle across and Beevers can’t go on his own without leaving a huge space for the two runners to attack.
Typically, if you have more men in midfield you would drop one of them into the space shown by the blue circle and defend with a layered, rather than flat, midfield line, but Posh can’t do this without giving Seamus Conneely (28) too much space to attack if Hamilton drops, while Taylor is man marking the nearest passing option and can’t drop without allowing Accrington an easy switch of play to exploit the far side. Therefore, Posh can’t immediately cover that space with a midfielder. What it means then is that when the cross comes in one of two things should happen:
Kent, if he recognises Charles’s movement and the lack of danger behind Beevers, can choose to cover that move rather than dropping into the defensive line. However, he doesn’t spot Charles’s run and moves to cover the back post where there is little threat
Both Taylor and Hamilton should drop to cover the 18-yard line as the cross comes in to ensure there’s not too much space in front of the defence. However, both of Posh’s midfielders, especially Hamilton, switch off, giving Charles complete freedom on the edge of the box.

The next clip is a full two seconds after the cross has come in. Kent is retreating to the back post and unaware of Charles’ movement. Taylor (8) has started to drop centrally but is perhaps a little slow in his actions. However, look at Hamilton (22), he is looking straight at Charles but at no point moves to cover him. He should have taken charge of the situation, recognised the danger, and dropped to cover it earlier. There was four seconds between the ball being crossed and Charles’ volley (second clip below), of which Hamilton was directly watching Charles for a full three seconds without reacting. In fact, it is Taylor who eventually spots and reacts, admittedly too late, to the danger. Despite all this Posh can count themselves a little unfortunate to concede as Charles’s technique and execution of the volley is outstanding!

For both goals, the lack of pressure undoubtedly makes the chance easier than it would otherwise be, but Posh can count themselves very unlucky to have succumbed to two sublime finishes. Where you stand on the unlucky to poor defending/setup sliding scale of blame depends largely on personal viewpoint and in truth the answer lies somewhere in the middle. Posh will not continue to concede worldies with the regularity they have thus far, but they could also help themselves by doing a better job of defending the space in front of the defence.
Cheltenham Town
Finally, let’s look at the first goal Posh conceded this year, in the 1-0 Carabao Cup defeat to Cheltenham Town. There’s a lot going on here to dissect.
First, the eagle-eyed viewers among you will have noticed that, from the corner, Posh’s setup was the same as
the one from last season as opposed to the one from Fleetwood, with the front zonal marker, in this case Ward,
near the corner of the six-yard box rather than close to the corner taker. It remains to be seen whether the
change for Fleetwood was due to Fleetwood having a player in position for a short corner or a change in
system. To muddy the waters even further, against Accrington, Posh setup with both two zonal markers in
the six-yard box AND the man nearest the corner taker (this was the case for two of the three corners, for the
first they did not have a man near the 18 yard line), before ditching the second six yard box zonal marker vs
Fleetwood. Last season Posh rarely changed their defensive corner setup so this may be a sign they are
becoming more responsive to the threats of the opposition, which to my mind at least is a good thing.


The relevant section and logic behind the change can be seen below.


Then there is the rather unfortunate fact that Sercombe strikes his shot past three players in position to block, including through the legs of Beevers. However, Taylor does not help his own course by jumping as he goes to block meaning the ball goes underneath him. If we’re being super critical, we could also criticise Taylor for turning to his side in the block, which makes a clean block less likely and increase the chances of a deflection wrong footing the keeper.
Finally, and again this is super critical, Pym makes a technical error on the save, although the shot is hit hard, comes through bodies reducing his sight and reaction time as well ending up low and close enough to the corner that it would be an incredibly hard save to make even with the correct technique. That said, if you watch closely when the shot comes in you’ll see Pym takes a ‘negative step’, moving the foot furthest from the direction he wants to dive, in this case his left, away from the ball. He should take a ‘positive step’, moving his right foot towards the area he wants to dive to which would allow him greater coverage of his goal. If he does this then maybe, just maybe, he has a chance of saving the shot. I’ve tried to illustrate this in the clips below.


The shot is fairly close to the corner and hit hard. However, Pym isn’t a million miles from saving it. If he takes a positive step can he get there? Maybe, maybe not…
Conclusion
To finish, I’d like to reiterate that, despite the fact I have largely looked at flaws in Posh’s defensive structure, they have, since switching to a back three in January 2020, been excellent defensively. No defensive structure can ever be perfect and in Posh’s case it’s been shown that they can at times be exposed from set plays, while the area in front of the defence can also be an issue.
However, the latter especially is not a huge problem, although it is one they should still look to find solutions to. Teams will not continue to regularly bang goals in from 18+ yards, although they will probably score from a higher than average rate from these areas given Posh’s setup and extra space/freedom on the ball. When Posh come up against sides with very technical and creative players in these zones they could also be in trouble, but how often will that happen in League One this season?
Posh have also slightly tweaked their defensive corner setup and the goal against Fleetwood came from an individual, rather than structural, error. It remains to be seen whether Posh have sufficiently addressed some of the weaknesses they showed when defending corners last season, when the front and back post areas could at times be exploited by opposition sides. This is definitely one area to keep a keen eye on in future games.
No comments:
Post a Comment